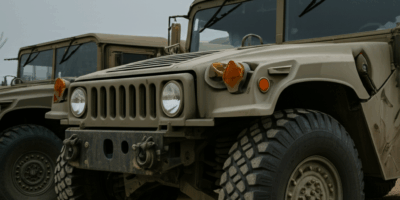
Military vehicle restoration has gotten complicated with all the misinformation flying around online these days. As someone who’s spent over a decade pulling wrenches on everything from WW2 Jeeps to Vietnam-era deuce-and-a-halfs, I learned everything there is to know about bringing these old warhorses back to life. Today, I will share it all with you.
There’s something deeply satisfying about taking a neglected piece of military history and making it road-worthy again. It’s part mechanical challenge, part historical preservation, and honestly, part stubbornness. But if you’re thinking about diving into this hobby, you need to know what you’re getting into.
Assessment and Planning
Probably should have led with this section, honestly. Every restoration lives or dies based on the initial assessment. You need to be brutally honest with yourself here—what condition is the vehicle actually in? I’ve seen too many people convince themselves that their project is “mostly there” when it’s really a complete basket case.
What’s the goal here? Are you building a running driver that you can take to shows and parades? A concours-level show winner? Or a historically accurate restoration that would make a museum curator nod approvingly? Your answer shapes everything from budget to timeline to the parts you source.
Document everything before you start taking things apart. And I mean everything. Photographs from every angle, detailed notes, and labeled parts bags are your best friends. Many restorers—myself included, early on—underestimate how important documentation is until they’re sitting in the garage at 11 PM staring at a box of mystery parts, trying to remember where that bracket goes.
Mechanical Restoration
For most of us, getting the vehicle running safely comes first. That’s what makes mechanical restoration fundamental to the whole project. Engine, transmission, brakes, steering, electrical—all of it needs to function reliably before you worry about whether the paint shade matches the original FSN specification.
Safety concerns override cosmetics every single time. A beautifully restored vehicle that can’t stop safely is worse than useless—it’s dangerous. I’ve seen guys pour thousands into bodywork while ignoring brake systems that were barely functional. Don’t be that guy.
Here’s a tip that’s saved me headaches: start with fluids and filters. You’d be amazed how many neglected vehicles respond surprisingly well to nothing more than fresh lubricants and basic service. But—and this is critical—try to start the engine only after you’ve verified oil pressure. Dry running destroys engines faster than almost anything else.
Brake systems require particular attention, especially on these heavy machines. Rebuild your wheel cylinders and master cylinders, replace all the rubber lines (they deteriorate even sitting still), and verify proper adjustment throughout. Military vehicles are heavy. Really heavy. Inadequate brakes cause serious accidents.
Body and Cosmetic Work
Rust is the enemy. I can’t stress this enough. Military vehicles often show corrosion in predictable locations—cab corners, bed floors, fender mounts, anywhere that water can collect and sit. If you’ve looked at enough of these rigs, you start to know exactly where to probe with a screwdriver before you even crawl underneath.
Address rust completely or don’t bother. Grinding, treating, welding in patches, and protecting the repair properly—skip any step and the rust comes back, usually worse than before. I learned this the hard way on my first restoration when I thought I could just paint over “minor” surface rust.
Paint decisions balance authenticity against protection. That’s what makes this choice tricky for a lot of restorers. Original military finishes were simple, single-stage paints that offered minimal corrosion protection—they were meant to be reapplied in the field, not last fifty years. Modern finishes last significantly longer but may not satisfy the purists in judging. Many restorers, myself included, compromise by using correct colors in modern paint systems.
Authenticity Considerations
How authentic should the restoration be? This is actually a more personal question than most people realize. Museum-quality restorations match every detail to military specifications—correct fastener heads, proper stenciling, period-accurate accessories. Driver-quality restorations prioritize function and appearance over perfect accuracy. Neither approach is wrong; they just serve different purposes.
Original data plates, markings, and accessories add both monetary value and historical interest. Reproduction items fill gaps when originals aren’t available, but they don’t carry the same provenance. And if you can actually document your vehicle’s service history—where it was stationed, what unit operated it—that elevates the whole project into something special.
Resources and Community
Technical manuals, or TMs as we call them, provide official military guidance on every system these vehicles have. These documents are available free online now, and they describe correct procedures and specifications for everything from adjusting valve lash to rebuilding the transfer case. They’re absolutely essential references for proper restoration work.
The military vehicle community itself offers invaluable support. Forums, clubs, local chapters, and events connect restorers with decades of accumulated knowledge, hard-to-find parts sources, and the kind of encouragement you need when you’re three years into a project that was supposed to take six months. Few hobbies have more helpful and welcoming communities than military vehicle restoration, and I’m grateful to be part of it.